This article describes the process for enabling a TLS endpoint for an application deployed to an Azure Container Instance. At the time of this writing, ACI does not provide an out-of-the-box solution for TLS/SSL, so Microsoft recommends setting up a separate container with a Nginx (“engine-x”) web server. This approach uses a sidecar pattern to allow TLS connections for your application without changing your application code. Nginx is a web server that can be used as a reverse proxy, load balancer, and HTTP cache. It also has support for TLS/SSL, URL rewriting, and redirection.
1.First obtain a certificate. This can be a self-signed certificate for non-production environments. Production environments will require a certificate issued by a trusted authority (CA). You will need the .crt and .key files from the certificate. The .crt file is the public part of the SSL certificate. Do not commit the .key file in source control or display its contents anywhere in plain text. This is the private key and therefore highly sensitive information.
2. Save the .crt and .key files somewhere in your local file system.
3. Create a configuration file for Nginx to use TLS. Start by copying the following text into a new file named nginx.conf. Commit this file to source control. It doesn’t really matter where you put it in the repository.
# Configuration file for Nginx to use TLS
# https://docs.microsoft.com/en-us/azure/container-instances/container-instances-container-group-ssl#create-nginx-configuration-file

# Run as a less privileged user for security reasons.
user nginx;

worker_processes auto;

events {
  worker_connections 1024;
}

pid        /var/run/nginx.pid;

http {

    # Redirect to https, using 307 instead of 301 to preserve post data

    server {
        listen [::]:443 ssl;
        listen 443 ssl; # the server will only accept SSL connections on Port 443

        server_name _;

        # Protect against the BEAST attack by not using SSLv3 at all. If you need to support older browsers (IE6) you may need to add
        # SSLv3 to the list of protocols below.
        ssl_protocols              TLSv1.2;

        # Ciphers set to best allow protection from Beast, while providing forwarding secrecy, as defined by Mozilla - https://wiki.mozilla.org/Security/Server_Side_TLS#Nginx
        ssl_ciphers                ECDHE-RSA-AES128-GCM-SHA256:ECDHE-ECDSA-AES128-GCM-SHA256:ECDHE-RSA-AES256-GCM-SHA384:ECDHE-ECDSA-AES256-GCM-SHA384:DHE-RSA-AES128-GCM-SHA256:DHE-DSS-AES128-GCM-SHA256:kEDH+AESGCM:ECDHE-RSA-AES128-SHA256:ECDHE-ECDSA-AES128-SHA256:ECDHE-RSA-AES128-SHA:ECDHE-ECDSA-AES128-SHA:ECDHE-RSA-AES256-SHA384:ECDHE-ECDSA-AES256-SHA384:ECDHE-RSA-AES256-SHA:ECDHE-ECDSA-AES256-SHA:DHE-RSA-AES128-SHA256:DHE-RSA-AES128-SHA:DHE-DSS-AES128-SHA256:DHE-RSA-AES256-SHA256:DHE-DSS-AES256-SHA:DHE-RSA-AES256-SHA:AES128-GCM-SHA256:AES256-GCM-SHA384:ECDHE-RSA-RC4-SHA:ECDHE-ECDSA-RC4-SHA:AES128:AES256:RC4-SHA:HIGH:!aNULL:!eNULL:!EXPORT:!DES:!3DES:!MD5:!PSK;
        ssl_prefer_server_ciphers  on;

        # Optimize TLS/SSL by caching session parameters for 10 minutes. This cuts down on the number of expensive TLS/SSL handshakes.
        # The handshake is the most CPU-intensive operation, and by default it is re-negotiated on every new/parallel connection.
        # By enabling a cache (of type "shared between all Nginx workers"), we tell the client to re-use the already negotiated state.
        # Further optimization can be achieved by raising keepalive_timeout, but that shouldn't be done unless you serve primarily HTTPS.
        ssl_session_cache    shared:SSL:10m; # a 1mb cache can hold about 4000 sessions, so we can hold 40000 sessions
        ssl_session_timeout  24h;


        # Use a higher keepalive timeout to reduce the need for repeated handshakes
        keepalive_timeout 300; # up from 75 secs default

        # remember the certificate for a year and automatically connect to HTTPS
        add_header Strict-Transport-Security 'max-age=31536000; includeSubDomains';

        ssl_certificate      /etc/nginx/ssl.crt;
        ssl_certificate_key  /etc/nginx/ssl.key;

        location / {
            proxy_pass http://localhost:80; # TODO: replace port if app listens on port other than 80

            proxy_set_header Connection "";
            proxy_set_header Host $host;
            proxy_set_header X-Real-IP $remote_addr;
            proxy_set_header X-Forwarded-For $remote_addr;
        }
    }

    server {
        listen 80; # This instructs the system to catch all HTTP traffic on Port 80
        return 307 https://$host$request_uri; # This is a short code to specify the HTTPS version of whatever the user has typed
    }
}
The first server block allows the server to only accept SSL connections on port 443. The second server block (or rule) instructs the web server to automatically redirect server connections on port 80 (HTTP) to use HTTPS.
4. In location, be sure to set proxy_pass with the correct port for your app. In this example, we set it to port 80. Nginx will listen for traffic on port 443 and redirect it to your internal app listening on port 80.
5. The next step is to Base64-encode the Nginx configuration file, the TLS/SSL certificate, and the TLS key. Run the commands below in a shell prompt replacing for the name of your .crt and .key files (or rename your cert and key files to ssl.crt and ssl.key)
Declaring a volume of type secret and call it “nginx-config” in the volumes node. Paste in the Base64-encoded values for ssl.crt, ssl.key, and nginx.conf generated previously. Do not include the ssl.key in plain text. Instead, consider injecting it through a pipeline runtime variable.
Caption: supplying the Base64-encoded values for the certificate and nginx.conf files as a secret volume
7. Deploy the container group. Test the settings by issuing a HTTP request with Postman. You should see the request redirected to HTTPS and/or it will return an error saying that HTTP requests are not allowed.
8. Confirm the certificate is installed. Open a CLI prompt in the nginx container. Change directory to /etc/nginx and you should see the certificates installed there.
If you deploy your container group in an Azure virtual network, you can consider other options to enable a TLS endpoint for a backend container instance, including:
This document describes the process of installing a certificate inside a Docker container’s trusted root certificate store.
The first step is to load the .crt file into the container’s file system. Have in mind that .crt is the public part of an SSL certificate. You should never store sensitive information, secrets and passwords alike, in a container or in a source control repository.
Add the .crt file in the same folder as your Dockerfile
Make sure the .crt file is included in your build’s output directory (e.g., the ‘bin’ folder). In Visual Studio, you can do this by right-clicking the file and enabling the “Copy to Output Directory” property.
Add these lines to the bottom of your Dockerfile but before the ENTRYPOINT.
RUN chmod 644 /usr/local/share/ca-certificates/my-cert.crt && update-ca-certificates
The COPY statement adds the certificate to the container’s trusted root certificate store which is located in usr/local/share/ca-certificates. If the certificate is not copied or if you get a “file not found” error, make sure the source path is relative to your application’s build context and the target path to the WORKDIR.
The RUN statement gives read and write access to the owner in the file and updates the trusted certificates.
Confirm the certificate was successfully installed by inspecting the etc/ssl/certs folder inside of the container. Your certificate should appear here with a .pem extension.
And that’s it! That’s all you should need to install a trusted certificate. You can test if the certificate was configured correctly by curling the target server:
curl --verbose https://<host>:<port>
If the connection is successful and verified by the root certificate, you should see a “ssl certificate verify ok” message in the response.
In this example, I create a PowerShell script that authenticates to a container registry in Azure (ACR) using an access token provided in the appsettings.json configuration file.
# Use ConvertFrom-Json to access the appsettings.json as an object (requires PowerShell 7+)

$appsettings = Get-Content -Path appsettings.json | ConvertFrom-Json

# get the access token

$acrpwd = $appsettings.AzureContainerRegistry.AccessToken

# run docker login by hardcoding the username provided by the access token* and suppling the password through stdin which is more secure

echo $acrpwd | docker login -u myacr-azurecr-io-token --password-stdin myacr.azurecr.io
*when I created the access token in ACR, Azure generated a username along with the access token. The username is what you see above as myacr-aurecr-io-token
1. In the Azure portal, navigate to your existing container registry
2. Go to Access Keys
3. Create an access key if there isn’t one yet
4. Copy the username and password that was generated. These are the credentials you will use to authenticate with ACR
Step 2: docker login
1. From a terminal window, run docker login using the username and password provided by ACR in step 1. If there are cached credentials, you might want to run first ‘docker logout’ and remove any existing credentials stored in KeyChain (MacOS), WinCred (Windows), or pass (Linux). By default, Docker looks for the native binary on each platform for storing credentials
Step 3: docker compose
1. Navigate to Azure portal > > Repositories > and click on the latest image tag. From here you will be able to copy the URL to pull down the image
2. Add the image in Docker Compose. For example:
3. Run ‘docker compose up’ at this point. If the project fails to pull the image, try running a ‘docker pull’ command from a separate terminal and make sure you are able to pull the image using the credentials supplied by ACR
This document describes the process of using Key Vault for storing and loading secrets inside your .NET Core application.
Step 1: Register your application in Azure Active Directory
You will register the application to generate a ClientID and Client Secret so your application can have permissions to access the Key Vault resource.
a. Navigate to portal.azure.com and access the Azure Active Directory page (requires AD Tenant Admin permissions)
b. Navigate to the App Registrations page
c. Select New Registration
d. In the Nam e section, enter a meaningful application name that will be displayed to users of the app
e. In the Supported account types section, select Accounts in this organizational directory only ({tenant name})
f. Select Register to create the application
g. On the app Overview page, find the Application (client) ID value and record it for later. You’ll need it to configure the Visual Studio configuration file for this project
h. From the Certificates & secrets page, choose New client secret
i. Type a key description
j. Select a key duration of either 12 months, 24 months, or Custom
k. When you press the Add button, the key value will be displayed, copy, and save the value in a safe location
l. You’ll need this key later to configure the project in Visual Studio. This key value will not be displayed again, nor retrievable by any other means, so record it as soon as it is visible from the Azure portal.
Step 2: Create the Key Vault resource in Azure
a. Create Key Vault using the convention az{region}{env}{appName}-kv. azuse2devmyapp-kv, for example
b. Go to Access Policies in Key Vault
c. Click Add Access Policy
d. Click Secrets Management from the template
e. Click Select principal
f. Select the registered app in step 1
Step 3: Add the secrets
a. Navigate to the Secrets page in your Key Vault instance
b. Click Generate/Import
c. Enter a name and value. Use a double dash in the key name to create a hierarchy with the keys. For example, if I enter the key name AzureTableStorage–ConnectionString, it would be equivalent to the key declaration below in appSettings json:
AzureTableStorage: {
ConnectionString: “<>”
}
Step 4: Client App Code changes
a. Install the Nuget packages Azure.Identity, Azure.Extensions.AspNetCore.Configuration.Secrets, and Azure.Security.KeyVault.Secrets
b. Add the following to your appSettings.json file:
Url: copy this from the Overview page of your Key Vault in Azure
ClientSecretId: the secret generated for your app in step 1
TenantId: the Active Directory tenant ID used to register your app in step 1
ClientId: the unique client ID generated for your app in step 1
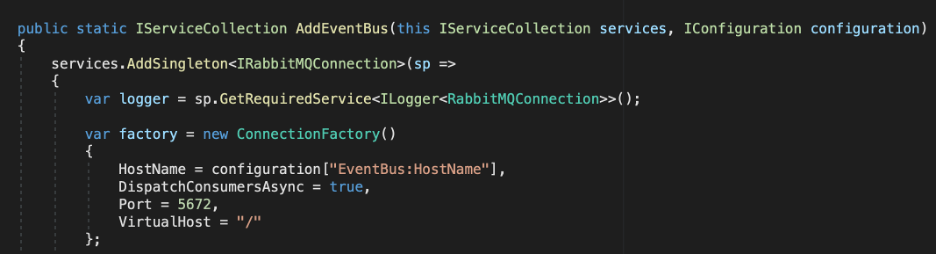
c. Update IHostBuilder CreateHostBuilder():
d. This is all you need to do to configure your app with Key Vault. In the example below, the HostName is retrieved from configuration[“EventBus:HostName”]. It will look in Key Vault for a key with name EventBus–HostName (notice the usage of double dash to indicate a hierarchy). It will override the EventBus:HostName value you have in your local appSettings.json with the value created in Key Vault.
You have to clear the Visual Studio template folder.
In your Mac, navigate to C:\Users\<username>\.templateengine\Visual Studio folder. If you don’t see .templateengine, it may be hidden, so press Command + Shift + . to display hidden folders.
In this folder, you should see version numbers like 7.0 or 8.0. Rename these directories or delete them.
You should now be able to add projects and files to your solution again.
The scenario is a sample daemon app (console) that uses the Microsoft Identity Platform to access the data from a protected Web API, in a non-interactive process. The console application will:
Acquire an access token from the Microsoft Identity Platform as an application (no user interaction)
Access the secure REST API to get or modify a resource
Step 1: Register the resource API in AAD
Navigate to portal.azure.com and access the Azure Active Directory page (requires permissions)
Navigate to the App Registrations page
Select New Registration
In the Name section, enter a meaningful application name that will be displayed to users of the app, for example TodoList-webapi-daemon-v2
Leave Supported account types on the default setting of Accounts in this organizational directory only
Leave the redirect URI empty
Select Register
On the app Overview page, find the Application (client) ID and Tenant ID values and record them for later. You’ll need it to configure the Visual Studio configuration file for the project
Select the Expose an API section
Use the ‘Set’ button to generate the default AppID URI in the form of api://<web api client id>
Click Save
Now you will expose an application role by updating the API’s appRoles section of the application manifest to specify the type of application role(s) that can access this secure API
Your app registration must expose at least one scope or one application role
Scopes are exposed by web APIs that are called on behalf of a user
Application roles are exposed by web APIs called by daemon applications (that calls your web API on their own behalf)
Select the Manifest section
Update the appRoles section with the JSON snippet below. Leave the allowedMemberTypes to Application only. You can add multiple appRoles to this section, we need only one, although if you do decide to add some additional roles you’ll need to ensure that the “id” attribute is a unique GUID.
{
…
“appRoles”: [
{
“allowedMemberTypes”: [
“Application”
],
“description”: “Daemon apps in this role can consume the web api.”,
“displayName”: “DaemonAppRole”,
“id”: “<GENERATE AND PASTE A UNIQUE GUID HERE>”,
“isEnabled”: true,
“value”: “DaemonAppRole”
}
],
…
}
In the resource API’s appSettings.json file, put these values:
ResourceId: the secured API’s application ID URI created when registering the application with the format “api://APP-ID”
TenantId: the unique identifier of the active directory being used. The one used in the sample below is merely for demonstration
*The steps above will soon be available to complete through the Microsoft Graph API endpoints. This is currently in beta phase, and it’s not recommended for production applications but it’s worth revisiting it in the future to speed up the process.
Step 2: Register the client app (daemon-console) in AAD
Navigate to portal.azure.com and access the Azure Active Directory page (requires AD Tenant Admin permissions)
Navigate to the App Registrations page
Select New Registration
In the Name section, enter a meaningful application name that will be displayed to users of the app, for example daemon-console-v2.
In the Supported account types section, select Accounts in this organizational directory only ({tenant name}).
Select Register to create the application.
On the app Overview page, find the Application (client) ID value and record it for later. You’ll need it to configure the Visual Studio configuration file for this project. There’s no need to set up an Application ID URI like you did with the resource API since this is only the client application
From the Certificates & secrets page, in the Client secrets section, choose New client secret
Type a key description (of instance app secret),
Select a key duration of either 12 months, 24 months, or Custom.
When you press the Add button, the key value will be displayed, copy, and save the value in a safe location.
You’ll need this key later to configure the project in Visual Studio. This key value will not be displayed again, nor retrievable by any other means, so record it as soon as it is visible from the Azure portal.
In the list of pages for the app, select API permissions
Click the Add a permission button
Ensure that the My APIs tab is selected
Select the API created in the previous step
In the Application permissions section, ensure that the right permissions are checked: DaemonAppRole
Select the Add permissions button
Click the Grant admin consent for {tenant} button, and then select Yes when you are asked if you want to grant consent for the requested permissions for all account in the tenant. You need to be an Azure AD tenant admin to do this.
In the client app’s appSettings.json, put these values:
TenantId: the unique identifier of the active directory being used. It should be the same for both resource and client applications. The one used in the sample is merely for demonstration
ClientId: the id of the daemon app wanting to access the resource API
ClientSecret: the secret generated for the daemon app in the previous steps. It must not be stored in plain text in appSettings.json. Instead, the secret should be stored and retrieved from a secure source, like iVault.
BaseAddress: the resource API’s endpoint address
ResourceId: the application Id URI from the resource API created in step 1
Step 3: Resource API Code Changes
Add the Microsoft.Identity.Web NuGet package to the project
Add the Microsoft.AspNetCore.Authentication.JwtBearer NuGet package to the project
There’s no denying that the amount of skills required in software engineering can feel overwhelming. With the fast advancement in technology, it seems that everyday there’s a new library, framework, programming paradigm, or programming language to be learned. It’s not uncommon for job postings to include more than a dozen technical requirements, even for entry-level positions. This can seem intimidating, especially if you are new to the field. In order to help navigate through this landscape, I’ve compiled a list of skills I would learn if I had to start over. A lot has changed in the 12 years since I learned how to program so I’ve tried to keep this list relevant to the skills that are in demand today. I have also ordered the skills more or less in the order in which I would learn them. This is not a comprehensive list. It’s intended as a starting point. Each skill is important enough to have made it into the list and you will most certainly encounter them in any project you’re involved with.
Entry Level
Must-know
HTML
CSS
JavaScript
OOP Principles (abstraction, encapsulation, inheritance, and polymorphism)
Make sure you understand what each of these concepts mean. I would recommend writing some code examples demonstrating each principle in practice.
SQL querying
One backend language such as C#, Java, or Python
One tip. Being skilled at any of these languages will give you endless opportunities. If you have no preference, pick C#. The .NET community is amazing!
Bonus
MVC pattern
It appears this pattern is beginning to lose popularity but it’s still quite popular (42%) according to a recent survey. Not only that, it will also teach you about separation of concerns.
Data Structures
Git
Learning Resources
freeCodeCamp
CodeAcademy
Edx or Coursera
CodeWithMosh
For data structures, it’s good to know what are the main data structures and how they are implemented. The best way to learn this is to implement them yourself (stacks, queues, lists, dictionaries, and deques). Almost any freely available course on DS will do, but I would recommend this one on Coursera: https://www.coursera.org/learn/algorithms-part1
Junior Level
Must-know (in addition to everything above)
Git
A backend application framework like Asp Net Core or Java Spring
One front-end framework like Angular 2+, React, or Vue
Pretty much standard on any new applications with complex UIs
Dependency Injection
Writing unit tests and how to mock dependencies
Transactional database concepts (ACID)
An ORM like Entity Framework (.NET) or Hibernate (Java)
Making asynchronous HTTP requests (AJAX) with jQuery
HTTP protocol principles
REST protocol principles
Writing Web APIs
Understand JWT Authentication
Understand lazy loading
Docker
Containers are here to stay. There is an era before and after containers. There’s no going around this one for building modern and scalable applications. Learn it.
Monitoring and logging
Use Pull Requests with build policies for code reviews
Agile principles
Become familiar with DRY, KISS, YAGNI, and Hollywood Principles
Bonus
This is a good time to start getting deep into SOLID principles and into the land of the senior engineer.
SOLID principles
It will teach you the principles for writing highly cohesive and loosely-coupled code
Define high cohesion
Define loose coupling
Knowledge check: what is the relationship between dependency injection and inversion of control?
Azure or AWS
Different branching strategies
This is a hot topic in many development teams. I have learned different branching strategies from the projects I’ve worked with, reading about the topic, and asking other teams how they do their branching and why they do it in that way. I compile the different strategies and their use cases into a list for future reference.
Learning Resources
CodeWithMosh, Udemy, LinkedIn Learning, and Pluralsight
The 23 classic software design patterns by the Gang of Four. They were created in 1994 but are still very relevant today. You will see incarnations of these patterns in frameworks, libraries, and in the projects you are maintaining. You may be applying some of the patterns already and not know it. Start learning these early. They will help you design your code to solve recurring problems in an elegant way. They will also help you better understand the implementation and design decisions behind several libraries and frameworks. Write code examples of each pattern to help solidify the concepts.
CI/CD pipelines
Being able to create pipelines to build, test, lint, and deploy your application
Can be implemented with CI servers such as Azure DevOps, Jenkins, TeamCity, or CircleCI
The more you know of DevOps, the more you will stand out. The market is in need of developers that know how to work with the infrastructure as much as the code.
API design principles
You should be able to describe the entire REST API request lifecycle from authentication to the returned status code
Microservices
Learn how and why to work with IoC containers
Learn how and why to apply the mediator pattern in microservices
Integration Testing
Orchestration with Kubernetes
Implementing messaging systems with RabbitMQ, Kafka, or Azure Service Bus
GitOps foundations
Systems Design
Load Balancing
Bonus
Micro Frontends
Cloud Architecture Patterns
Reactive Programming
Event-Driven Architecture
Domain-Driven Design
Networking Concepts
Security Concepts
Distributed Systems (CAP theorem, BASE, consistent hashing, leader election, PAXOS and RAFT consensus algorithms, P2P networks, replication, and sharding)
I believe that once you’re about half-way through the senior must-knows list, you start focusing more on perfecting your craft, expanding your knowledge to new frontiers, going deeper into other subjects you are familiar with, or tinkering with the cool new framework in the block. The world is your oyster!